
|
Step
1. Two Men Enter, One Man
Leaves
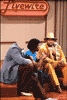
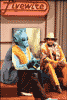
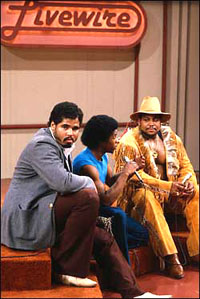
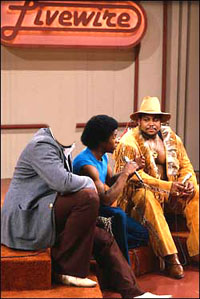
After you have selected a "Base" image (Livewire), you'll need to score a suitable
"Source" image. If you have the luxury of
choice, find something that offers similar lighting
(from above, from the side, ambient, whatever) and
viewing angle as the Base image. After farming the image
repositories over at theforce.net and
jedinet.com for
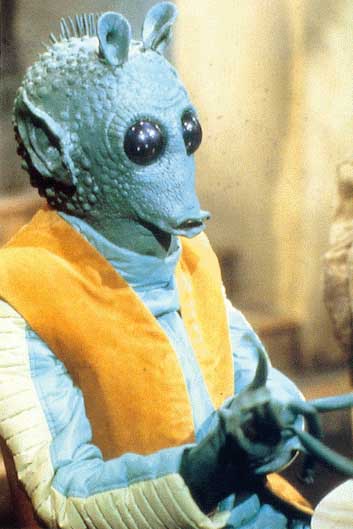
the elegant visage of one Greedo
Q. Rodian, we came upon an apropos head shot with a
good angle - right here.
|
|
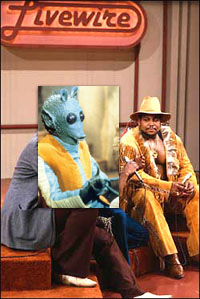
Step
2. Clone Wars
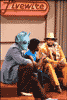
First prep the Base image for Rodian transplant. This is
done using the Clone Stamp tool and a feathered brush.
Removing the target noggin' from Livewire here was
fairly straightforward, as the background to be cloned
is a single solid color - no odd patterns or objects to
redraw.
|
|
Step
3. Shrinkage
Next Greedo's mug is sized to match his future Base
image body. This typically takes several attempts at shrinking
then drag-and-drop onto the Base image. Use Layer
Opacity to fade it a bit, which will help in judging if
the price is right. This particular image demanded to be
shrunk down to 23%. Be sure to keep the layers intact
through the rest of the process (that is, Base image as
background + Greedo head Source layer).
|

|
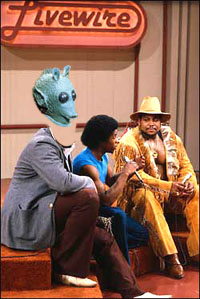
Step
4. The Man Behind the Mask
Now remove everything in the Greedo layer that ain't
Greedo. This is accomplished with a Layer Mask
(Layer> Add Layer Mask> Reveal All). Once the mask
is on there use an small black airbrush to erase the
background and body. Only a floating disembodied head
should remain. The sparkling beauty of a Layer Mask is
that you can fill-in the areas you didn't mean to erase
by flipping the airbrush color over to white.
|
|
Step
5. Rotate
Besides resizing, most Source images will require some
rotating
(edit> transform> rotate), or even horizontal flipping
(edit> tranform>
flip horizontal). Here Greedo's head needs to be rotated
a bit for a more natural fit onto his new shoulders. Eyeball that bad boy
until it looks right and apply the rotation.
Proceeding on after Step
5 is
what separates the men from the boys - all about th'
fine details
from here to the sea...
|
|
Step
6. Mask and Repeat
Once rotated and moved into place the layer mask should
be touched up to account for folds in clothing, hair, or
other obstructions. In this instance some of the
neckline was brushed-out so it appears as though the
background-layer shoulder is in the foreground, in
front of the head layer.
|
|
Step
7. "The Weed of crime
bears bitter fruit"
Next select the Greedo layer (entire head) and use the
airbrush to apply a slight shadow in the neck area.
Airbrush pressure set to about 30% with a large
feathered brush. For number one lucky results, don't
actually place the brush in the selected area, instead
brush just outside the selection line and let the unseen
feathered portion of the brush darken the target.
|
|
Step
8. Details
Even with the neck shadow, our man Greedo still doesn't
quite fit in with his new buddies. Play with the
Brightness/Contrast (image> adjust>
brightness/contrast) until the overall head tones better
match his surroundings. This particular job called for
Brightness -25 and Contrast +15.
|
|
Step
9. Details
Like a hearty broccoli, Rodians are indeed green - but Greedo
here is sporting a bright alien green that just won't
pass in this "realistic" environment. Dumb
down the green by adjusting the Hue/Saturation
(image> adjust> Hue/Saturation). We knocked off
about 50% of the saturation here.
|
|
Step
10. And More Details
The Source image was a little over exposed to start
with, which washed out some of those dapper facial
features. We also shrunk that image quite a bit, which
only made things worse (in the detail
department). Use the Dodge and Burn tools to bring out
highlights and enhance dark areas. Here we enhanced the
circles around his eyes, gave a shadow to the area
behind his ear, and dappled a bit on that funky bumpy
area towards the back of his head.
|

|
Step
11. Das Beste ist Gut Genug
Finishing touches can include very light use of the Blur
tool (set to about 30% pressure) to take the hard edge
off the line where his neck meets the shoulders. Also
blurred the edge along the back of his head just
slightly for a heightened sense of depth. When complete,
you can even hide some of imperfections by shrinking the
image to about 85%...
|


