PROMOTIONAL LINK:
Choose among a variety of
front bookshelf
speakers that can
go along with your center channel speaker and subwoofer.
|
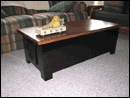
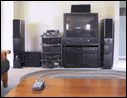
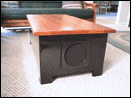
I want broken windows. Split drywall. Cracked concrete. The missus wants a nice coffee table. Operation: Thunder Table was planned out and executed by Mr. Philip Wise and myself. The intent was to construct a box that could dish out those punishing, chest-thumping tones, yet also function as an aesthetically pleasing coffee table. The current home theater is already replete with a couple 10" NHT subs (one in each right and left VT-2 tower, and one dedicated SW2Pi box in the corner). Attempts to insert an additional (massive) subwoofer in such an environment would typically receive a very low Spouse Approval Rating. Extreme Cunning was needed to bring such a project to fruition: Me: "Baby doll, the theater really needs more bass,
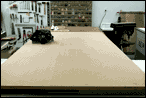
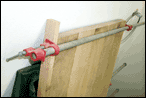
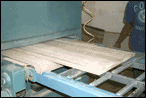
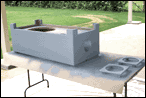
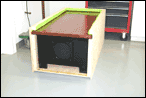
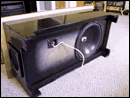
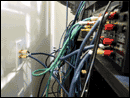
don't you think?" The concept was dangerously simple - covertly stuff the biggest DIY (Do-It-Yourself) subwoofer speaker I could lay hands on into the belly of this new so-called "coffee table" - Trojan Horse style. Conceal the speaker wire by running it from the first floor equipment rack down into the basement and back up through the floor into the middle of the living room - beneath the table. Cut a tiny, hardly noticeable slit in the carpet and hook that monster up. The execution was more complex. Philip contacted the knowledgeable Richard at Dallas Sight and Sound for DIY speaker recommendations. This resulted in the procurement of an 18" Kicker Competition driver ($400 list). Dallas Sight and Sound also suggested that despite the low budget inherent in most Do-It-Yourself projects, I not skimp on feeding the beast heapin' helpings of power; an NHT SA3 amplifier ($750 list) was called into play. The "table" would be constructed of 1" thick MDF (Medium Density Fiber) board - favored material of DIY speaker builders. The port would be an 11 ?" long tube of regular 6" PVC pipe. With construction materials accounted for, the next phase of the Operation was to plan out the size and overall look and feel. Stillwater Designs, parent company of the speaker manufacturer, determined that the driver required a box with exactly five cubic feet of space, which accounted for the space taken up by the speaker itself and a port. After perusing coffee tables at (the now defunct) Furniture.com, with an investigative eye towards typical table dimensions, it was concluded that our box should be 21" high, 46" wide, and 17" across - this would give the speaker her mandatory five cubic foot lung. Behold the Byzantine blueprints. The design would be modest and clean - rounded edges but no fancy embellishments. To instill more of a "furniture" feel it was decided that the top should be a nice richly stained wood. White Oak was within the budget and certainly within the realm of good taste. The rest of the table would be an unpretentious glossy black. One mean speaker tucked into a darling coffee table. Philip made a trip out to Hardwood Lumber where he selected some oak boards, which he had cut into five strips. Later he would arduously secure these strips together with dowels and wood glue. While I wasn't on hand for the amalgamation, I am told it was a Herculean effort. This was held together with pipe clamps and set aside for 24 hours. Once dry it would go back to the lumberyard to be planed and trimmed. After purchasing the MDF board we sketched out where exactly each cut needed to be and set to sawin' in Philip's New Wookiee Workshop. Though the weight of these massive 1" thick sheets of MDF board (4' x 8') made for some cumbersome cuts, we eventually ended up with three long boards (sides and bottom), two short (end caps), and an alarming amount of sawdust. These more manageable pieces were then carefully cut to exact sizes.
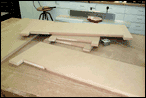
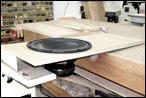
Not long after making our cuts we came to the disappointing realization that a 17" wide table floor wasn't going to accommodate an 18" wide Kicker speaker diameter. After re-negotiating a set of new dimensions (and kicking ourselves for being so very focused on the five cubic feet of space the driver required) we decided the table was going to be a bit wider and the bottom of the table would be raised into the cabinet to compensate for the extra space created. New cuts, and more sawdust, were made. Next we tackled the tricky business of knocking 3" legs out of the side and end boards. We then routed a ?" round-over along the edges of the boards that would form corners. A jigsaw was used to cut a large (18") hole in the bottom board where the speaker itself would rest. The whole affair was wood-glued together, nailed tight with a nail gun, and left to dry overnight.
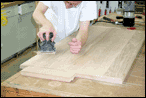
The next day Philip cut a square for the wire terminals into the table floor and we began spreading bondo (yup, same stuff you used to patch up your Chevy Impala) across any of the rough surfaces - particularly those that had been cut with a saw, filling in nail holes along the way. Now began a monumental amount of sanding - endless sanding until those rounded edges were creamy smooth.
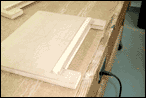
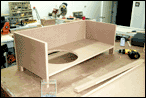
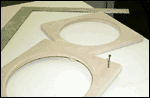
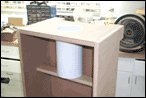
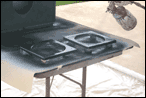
Because the port needed twelve inches of space plus some clearance there wasn't going to be enough room for it to vent towards the floor. A six-inch mouth yawning at one end of this table would certainly arouse suspicion. A masterful plan was formulated in hopes of camouflaging this bit of sonic-evidence: we'd conceal the hole with black speaker cloth, which would then be framed by a nice square piece of rounded ?" MDF board. We'd repeat the framing and cloth on the opposite end of the table. Not only would this serve to completely hide the port, but appear as though we had gone the extra mile to add a little flare to the table design (folks, there is no "off" position on the genius switch).
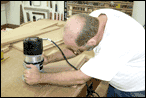
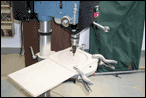
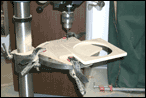
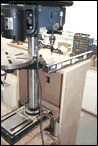
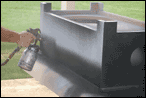
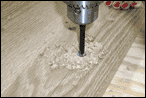
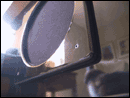
After measuring and cutting these new end cap boards (again with the sanding sanding sanding) we cut the hole for the port - which required some tricky set-up. Drilling a 6" hole into inch thick board is no easy task, especially since we had to do it after the box was assembled and were trying to be as precise as possible. After precariously positioning the drill press we successfully cut into the board with a variable hole-cutting bit. The 6" PVC pipe was then snugly fit into place and glued down with an epoxy, then set to dry for the evening.
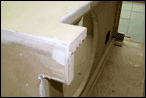
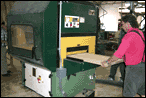
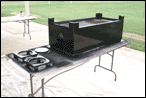
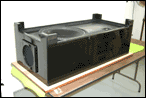
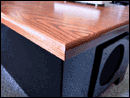
Earlier in the day Philip had taken our oak tabletop back to the lumberyard where it was planed, sanded and cut to length. Back at the Wise workshop it too was given a ?" round-over then sanded by hand. There isn't enough space on the server for the text file that would give a just description to the hours spent sanding that tabletop. After starting with 60 grit paper and working my way up to a 2000-grit paper, I was rewarded with a sleek mirror-like finish (and brand-new arm muscles). Now that the MDF portion of the table was assembled and sanded, it could be painted. The paint was professionally applied by Mr. Steve Farr, who first primed it with four coats of primer (which also served as a filler), then gave her eight coats of glossy black lacquer. The paint was given eight days to dry, mainly due to the high humidity that week, and was wet sanded, buffed, and polished with a car wax - resulting in a stunning mirror-like finish.
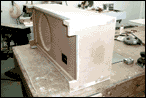
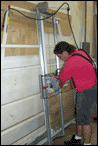
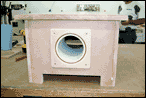
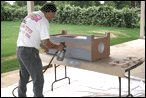
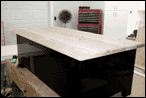
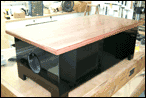
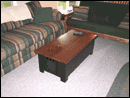
Whilst the body was drying the oak top was being stained (and stained again) with a common red oak stain, topped off six coats of Formby's tung oil. Staining complete, Philip then carefully drilled holes into the oak top - a misstep here at the end could be disastrous (splintered wood, splits in the grain). The drilling, however, went off without a hitch. The top was then secured to the MDF board body with a petite bead of silicone and screwed down. The screw holes were then filled with delicately cut oak plugs. Finally the speaker itself was wired up and bolted into place. The Magnum Opus concluded. The final step was to ship the hefty monster (final weight: 212lbs with shipping case and pallet) from Dallas to her new home in The Motor City. This required constructing a special form-fitting wood case and having it ground shipped. We used Watkin's Shipping, who did a fine job delivering the precious cargo.
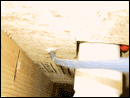
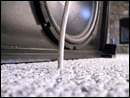
Introducing her to the rest of the home theater was a breeze once the hole for the speaker wire had been drilled into the floor. Drilling a hole into the middle of your living room is not something most spouses will take lightly. It calls for careful planning, checking and double checking (and constantly reassuring the little woman that it will hardly be noticeable, regardless of what you may really think). The end result in fact turned out to be a nice snug fit and not nearly the gaping wound I was concerned we'd end up with. Very discreet.
Mission accomplished. The results are stunning. Thor himself would gladly trade his hammer for the remote that commands this mighty piece of furnishing (though the son of Odin would first have to pry it from my cold fingers). The box is indeed everything I hoped it would be and more - without question the greatest thing I own. Rock solid construction, utilitarian design, and righteous sound - not available in any store. So, what happened the first time I tested her out? Scope the screen-shot!
|
|
|
||
| Costs: | Item: | Store: |
| $393.83 | NHT SA-3 Amplifier | Dallas Sight and Sound |
| $240.00 | 18" Kicker Competition driver | Dallas Sight and Sound |
| $94.28 | Watkin's Ground Shipping | Watkins Shipping |
| $59.33 | White Oak | Hardwood Lumber |
| $27.06 | Milling (planing/sanding) | Hardwood lumber |
| $.78 | Speaker Wire (internal) | Home Depot |
| $10.81 | Black Speaker Cloth | Radio Shack |
| $6.26 | 24" of 6" diameter PVC Piping | B-K Plumbing Supply Inc |
| $5.58 | Silicone Adhesive | Elliott's Hardware |
| $1.78 | 600 grit wet/dry sandpaper | Elliott's Hardware |
| $6.41 | Red Oak Stain x 2 cans | Home Depot |
| $4.30 | Felt (for shipping crate) | Hancock Fabrics |
| $139.53 | 1" thick MDF Boards | Hardwood Lumber |
| $.68 | Square-head fasteners x8 | Elliott's Hardware |
| $7.52 | 2"x2"x8' boards (shipping crate) | Lowe's Home Improvement |
| $14.95 | Black lacquer paint | Elliott's Hardware |
| $5.19 | Auto Repair Kit (Bondo) | O'Reilly Auto Parts |
| Estimated
Grand Total Note: estimation does not take into account tools and materials already in stock at the New Wookiee Workshop (epoxy, silicone glue, etc). |
||
| $1,018.29 | ||
![]()
Update: The mighty Table is bringin' down the house! Oh the humanity!

PROMOTIONAL LINK:
Choose among a variety of
front bookshelf
speakers that can
go along with your center channel speaker and subwoofer.